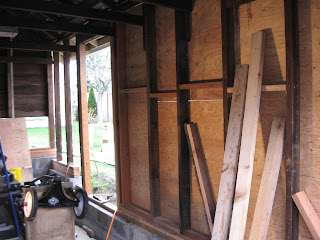
I have finally started to re-frame parts of the old garage. (I feel like I need to give her a name. If you have a suggestion, leave a comment with the name). Before I get in to telling you what I have accomplished, let me tell you the challenges a cheap bastard like myself has when it comes to framing. When using salvaged material, you need to be ready to add a few extra steps to the process. You can't just grab a fresh 2x4 off your pile of framing material, cut it to size and nail it into the wall. Chances are the salvaged board has nails in it that need to be pulled. Some times a few nails, some times a lot of nails. Take these board for instance.
Good boards... lots of nails. It is time to take a look at my up coming hand book "How To Build Like A Cheap Bastard" This is taken from chapter on framing. The section is called "How to de-nail a board- 101".
________________________________________________________________________________
... You must know your tools and which one is the right tool for the job. Having an assortment of pry bars will come in handy to face the number of types of nails you will encounter.
Of course hammer and nail pullers.
Always remember your eye protection. No fun trying to do this with a piece of nail stuck in your eye.
It is almost certain that you will salvage a number of boards that have been nailed together. I find that these are some of the best boards to salvage and re-use. Being joined together they generally have not twisted or warped over time. Here are some simple steps to pull these apart without a huge amount of cussing.
Step One: First you need to bend back any nails that have been bent over the board. Do this by first slipping the claw end of the hammer under the nail and pulling back. Then gently tap it back with the head of the hammer.


 |
| At some point in this process you may have to move up to a slightly larger crow bar for a little more "UMPH" and repeat this step |
Step three: Slide a larger pry bar between the two boards. At this time you may have to place the board on the ground and keep a foot on the lower board as you pull up on the upper board. The boards should pull apart with a little persuasion.
What you should have at this time are two boards with a bunch of nails sticking out of them. You can choose at this time to keep one of the boards like it is and turn it into a home security weapon, or move on to step three.
 |
| OUCH!! |
ALWAYS REMEMBER NOT TO LAY A BOARD FULL OF NAILS ON THE GROUND WITH THE NAILS STICKING UP! Nothing stops progress than a trying to pull a nail out of you shoe and foot!
Step Four: Tap the nails backwards until they are no longer poking out that side of the board. (see below for helpful hints on what to do if you bend a nail)**
Step Five: Flip the board over and use your pry-bar to pull the nails out. If the nails are pretty long, it helps to put a block of wood under the pry-bar for extra leverage.
If the head breaks off the nail, use a nail pullers.
Step Six: Dispose of the nails properly. I like to keep them in bucket because I love to see just how many nails I have pulled. Look around the area you have been working and make sure no stray nails are laying about. Especially if you have been working on your lawn and barefoot kids are near. I like to fill the bucket and take it down to the metal recycling center. I got 3 bucks for my last bucket of nails!
 |
| You now have two perfectly good boards for framing!! |
 |
| As you can see, I have salvaged quite a few! |
Here is what framing I have accomplished thus far.

I re-framed the south wall. This is where the old window was. I framed the rough opening for the door and a small window I salvaged. Using 1/2" ply that came off my neighbor's house I managed to sheet this entire side of the garage.
Next was the garage door opening. The entire west side is also getting re-framed and most of it was rotting away. I re-enforced the header and re-framed the opening. I put in a new beam over the header that was left for me by the guys who built the house next door.
A beam that come out of my neighbor's house is now in place in the center of the structure and I was then able to partially frame the loft. I now have a safe place for the windows and skylights I have salvaged.
The more I strengthen her bones the stronger my confidence in this structure.
My next goal is to button up the outside and make her weather tight. But in order to do that, I need to deal with moving this....
 |
| OH MAN!! THE TENT! |
***HELPFUL HINTS IF YOU BEND A NAIL!
1) STOP POUNDING!
2) DON'T PANIC!!
 |
| 3) Get your nail pullers! |
 |
| 4) Place the nail pullers slightly above the bend in the nail |
 |
6) O.K. Go back to pounding the nail out, but start softly and bring your hammer down straight for crying out loud!!
 |
| GOOD JOB. Now you deserve that martini! |


